App: https://chrome.google.com/webstore/detail/google-cast-for-education/bnmgbcehmiinmmlmepibeeflglhbhlea/related

Google Cast for Education
Google Cast for Education allows students to share their Chromebook screens with the teacher's computer that is connected to a projector.
App: https://chrome.google.com/webstore/detail/google-cast-for-education/bnmgbcehmiinmmlmepibeeflglhbhlea/related
App: https://chrome.google.com/webstore/detail/google-cast-for-education/bnmgbcehmiinmmlmepibeeflglhbhlea/related
Stop motion Animations on a Chromebook
Stop Motion Animation is a great educational tool. Here is a way you can have students do this on a Chromebook.
1. I suggest one of the IPEVO document camera's.
2. Go to http://www.gifpal-edu.com to get started creating your stop motion animation. You have the ability to do onion skinning, or annotate over the frame, but there is a limit of 48 frames per gif.
3. The gif file can be imported into Wevideo if you want to add audio or combine several gifs together to make a longer video than 48 frames.
Here is the end result:
How to Globally Manage Whitelists and Settings with uBlock Origin
Ads can be very distracting to students, or any user for that matter, and one way to prevent this distraction is to use an add-blocker extensions like AdBlock Plus or uBlock Origin. While these tools do work well, they can sometimes cause legitimate websites not to load properly. So while it may seem like a simple plan to just distribute an add-blocker out to the students, without the ability to globally manage a white-list of sites for them it could cause some real issues.
After doing some research we figured out that uBlock Origin has the ability to do just that; manage settings globally. The process is a bit clunky but it is possible.
The below research and instructions were created by a co-worker of mine, and I cannot take any credit for them.
~~~~~~~~~~~~~~~~~~~~~~~~~~~~~~~~~~~~~~~
Easiest way to begin making a change you want distributed to a group is to export the general settings currently setup in uBlock here (Backup to file):

You will get a text file containing all the parameters that can be changed within the extension. Once you’ve decided what it is you’d like to push out as a group policy setting, remove all entries from the exported settings file that do not pertain to the change(s) you have in mind. Once you’ve edited the settings as you find necessary, run the contents through a JSON validator to make sure the syntax is correct. I’ve found it is incredibly touchy: the difference between my initial whitelist setting working and not working was properly placed double forward slashes, instead of single ones.
In our case we initially looked to see how easy it would be to edit the whitelist remotely, making us able to easily add sites that uBlock may block crucial content on (this doesn’t appear to happen very often but being able to adapt as such is necessary). Here is a short example of an edited whitelist:
{"adminSettings": {"Value": "{ \"netWhitelist\": \"about-scheme\\nbehind-the-scene\\nchrome-extension-scheme\\nchrome-scheme\\nloopconversation.about-scheme\\nopera-scheme\\nforbes.com\\nespn.go.com\\nfhuhs.org\" }"}}
As you can see, only the \”netWhitelist\” value remains from the exported settings, and it is nested within adminSettings and Value parameters, which were added afterward, based on guidance found from a github thread (hopefully this is still hosted if we need it again). The \\n separates each page/domain from one another within the whitelist (forbes/espn/fhuhs added, all the others are default chromeOS settings pages)
Once you’ve readied your JSON text file for distribution, you can navigate to uBlock’s app management within the google admin console as such:
Head to device management

Click Chrome Management in the left-hand pane

Click on app management

Search for uBlock and click on the proper extension (there are different versions of uBlock)

Click on User settings (to open up what you see below) and navigate to the user OU to which you’d like to distribute the policy

If you’ve already pushed the extension out to that OU, or to a higher one from which it inherits that setting, force installation will already be turned on, but if it isn’t do that now. Under the second arrow is where the configuration file goes. If there isn’t one applied there will be a large Upload Configuration File button here; if there already is, there will be, as pictured, a view button to get a basic look at the JSON text file you’ve already uploaded for distribution, an X to remove that file, and save/cancel settings below to finalize your decision.
Here is working JSON text for a policy to disable the block element context menu option as well as push out four domains to the whitelist (fhuhs, forbes, espn, abc):
{
"adminSettings": {
"Value": "{ \"userSettings\": {\"contextMenuEnabled\": false }, \"netWhitelist\": \"about-scheme\\nbehind-the-scene\\nchrome-extension-scheme\\nchrome-scheme\\nloopconversation.about-scheme\\nopera-scheme\\nforbes.com\\nespn.go.com\\nfhuhs.org\\nabc.com\" }"
}
}
HP Chromebook 11 g4 tear-down and eval for 1:1
I want to thank The Top Floor for providing me a demo HP Chromebook 11 g4 that I was able to tear down and evaluate for our 1:1 program. Being from VT, they are one of my favorite vendors to work with.
First Impressions:
My first impression of the G4 is that it looks and feels very well built. The rubberized rounded edges and 180 degree fold back screen do make it a nicely designed device. I didn’t even turn it on before my partner in crime and myself took it apart, so I don’t have any information about its performance, or how the keyboard and mouse feel.
All-in-all, I think this is a rugged, well built device and should hold up to many bumps and bruises, however if you are looking to do in-house repairs this may not be the ideal choice for the sole reason is that the changing the screen is the most cumbersome of any Chromebook I have worked on. On the flip side, at least in VT, these were priced less than the Asus c202’s we are also looking at, and the build quality for the price is amazing.
So if you are doing in-house repairs I might suggest leaning toward the Asus c202, whereas if you are sending away for support, then I would definitely consider the HP 11 G4.

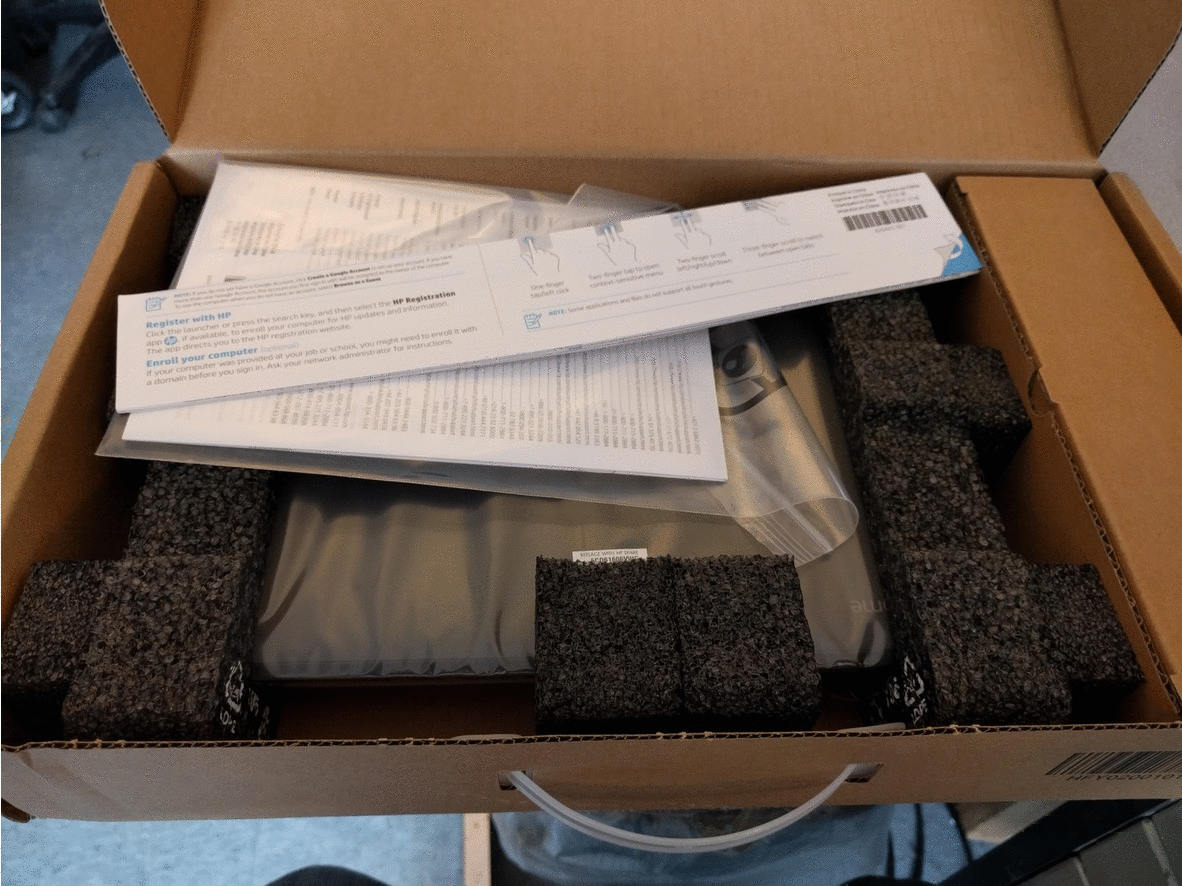
Packaging:
How a device is packaged has been a pet peeve of mine since I had to unbox 500 Acer 720’s two years ago. The HP 11 G4 was boxed about the same as the original Acer 720’s were There was not any little pieces of tape to peel off which was nice, but there was foam and papers that would immediately go to the trash. What I found out 2 years ago was that unboxing each device could take as long if not longer than enrolling it, so less waste and easier removal is something we were looking for.
Replacing the monitor:
I don’t care how durable you make the device, students will break the screen and this is the #1 repair that IT departments will be making on Chromebooks. If you plan to send away the device, then it really doesn’t matter, and you might not even be looking at this blog post. However in-house repairs can greatly decrease turnaround time, which is why it is so important to our school. That said I was very surprised at HP’s decision to make changing the monitor so hard, to the point where I am wondering if they did it purposely to discourage in-house repairs.
P.s. I have seen some video’s from earlier models where they were able to remove the screws behind the hinges without removing the bottom, but it is certainly not designed to work that way.
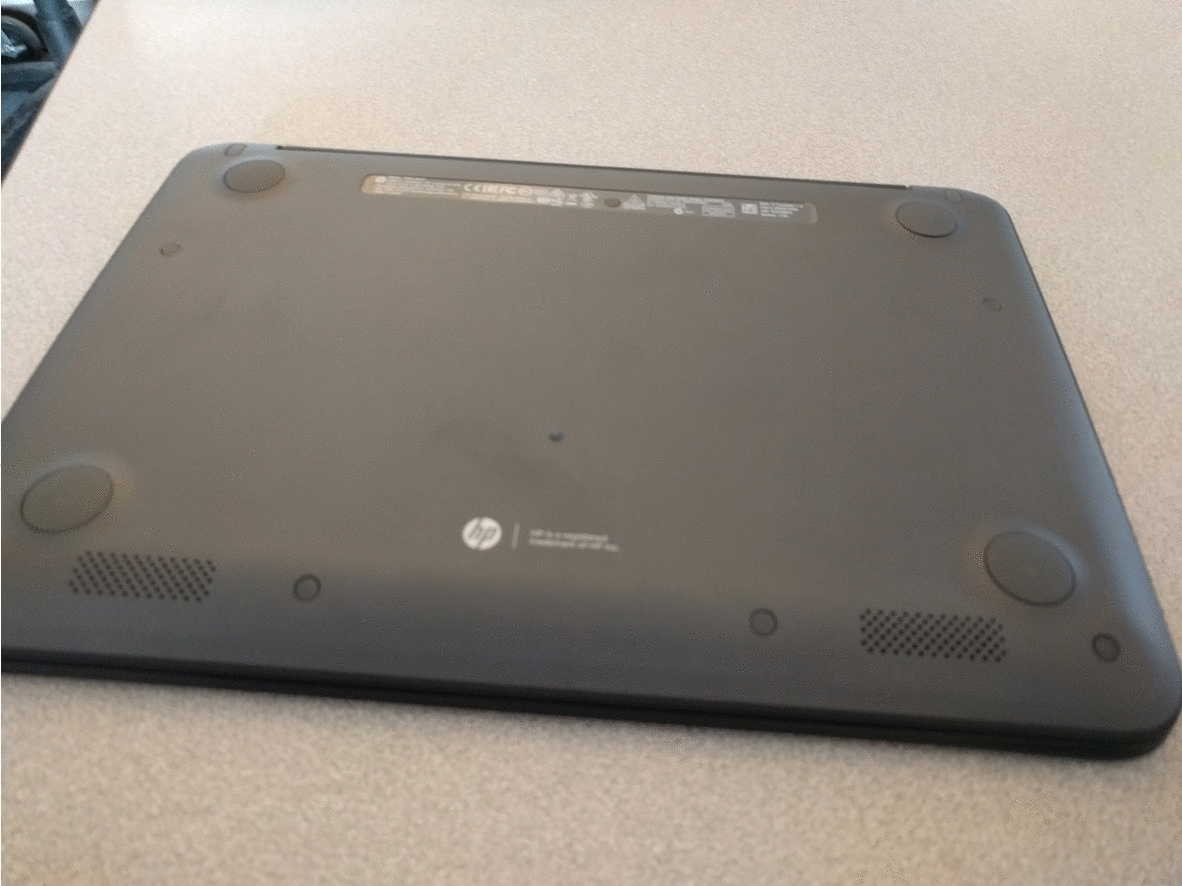
Pulling apart the bottom
If you want to replace the keyboard, power adapter, (or monitor), you need to disassemble the bottom of the device. I got fooled the first time I tried this and attempted to remove the feet. Well, those feet do not come off, and if you do manage to pry them up a bit, they don’t go back. What HP did do was hide all of the 9 screws holding the back on, behind some rubber stoppers. Each of these stoppers are different sizes and shapes so if you do take them apart, make sure to note where they go.
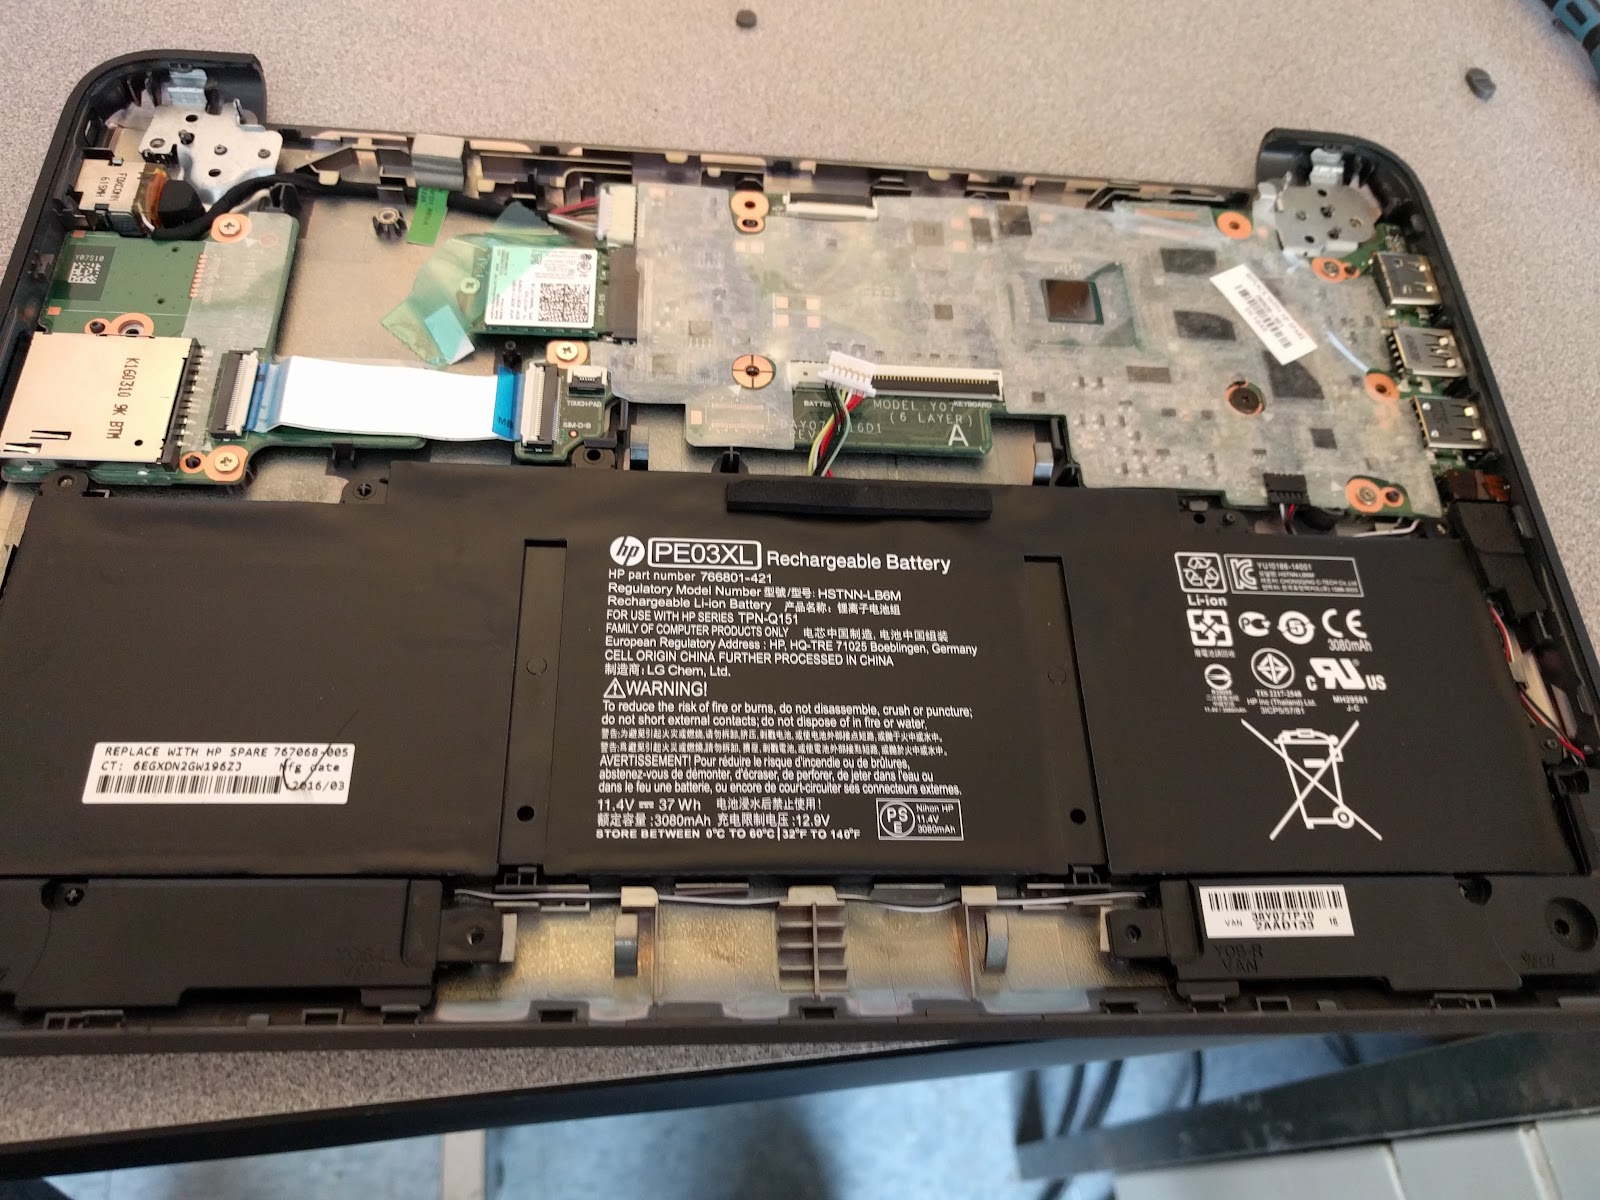
The Battery, keyboard & Internal components
Replacing the keyboard is very similar to the ASUS c202 and the Lenovo N21, where it comes off and as an easily replaceable item, it is also very beefy which I felt was a positive toward durability.
The battery is held on by two screws and some snaps. I had to lift up the speakers to be able to remove the battery. After my experience with plastic mounts breaking on the 720’s, I think this is the weakest point of HP’s design. I bet that after 2 years of use, people will see this batter has broken loose and hopefully will not cause any damage. The Acer 720’s also have a 2 screw design and we have seen a high failure rate due to mouts breaking and the battery being able to shift.
The ram and hard-drive is soldered in so there is no repairing or upgrading this device without replacing the entire motherboard.
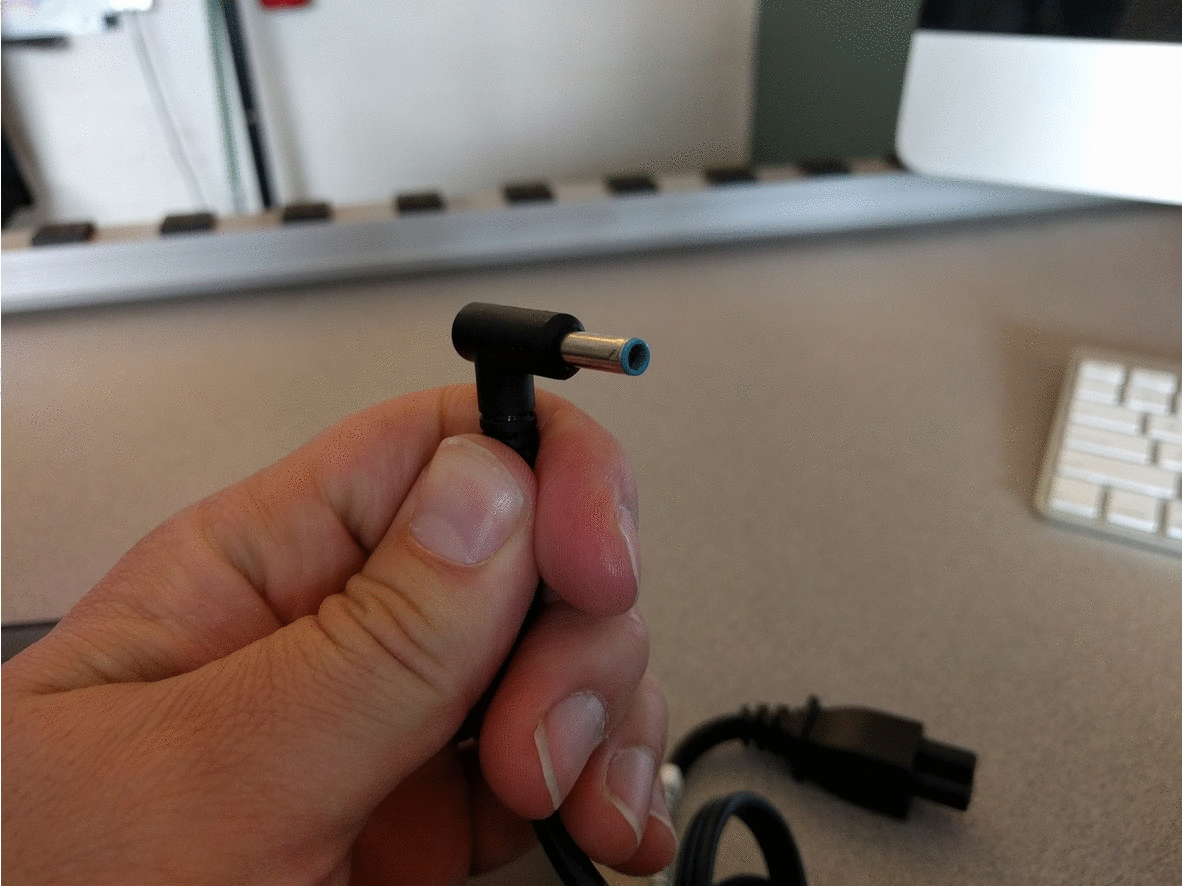
Power adapter
This is a definite plus for the HP. The plug itself that goes into the device is large and sturdy, and once inside the plug is not soldered to anything, so it can jiggle around and it will not affect the operation. Even if the port fails, it is a simple matter of replacing a plug.
Subscribe to:
Posts (Atom)