Welcome to EdListen:
Never Stop Learning

Bingo Choice Board by EdListen


Directions for Use
  1. Make a copy of the template
  2. Update the Lists sheet
    1. You can easily randomize the lists by selecting a list and then clicking Data => Randomize Range
  3. Hide the list sheets to keep it simpler for students.
  4. In Google Classroom create a new assignment
  5. Attach your version of Bingo Choice Board, and set it so that "Make a copy for each student"
  6. When a student gets Bingo have them "Turn-in" the sheet. 


Why Websites Make a Great Platform for PLPs and Why I Don't Use Them

Personal Learning Plans (PLPs) are either loved or hated and it really depends on how they are used.   I personally really like them, because it gives students the opportunity to get credit for those amazing things that they do that they don’t get graded on.  Those that are not so happy with them, think PLPs is just a lot of extra work, and just one more state-mandated activity.


I can’t really blame the people who find them extra work;  I have seen so many PLPs launched where they just took up time and really didn’t provide any viable educational value to the student themselves.   I really tried to change that when I designed the Personal Learning PATH (PLPATH) workflow: https://path.edlisten.com/.    I want to highlight that I consider PLPATH a “workflow” to use when creating PLPs.  The reason for this is because workflows are platform-independent.  This allows the freedom for schools and students to choose their own tool to use to help them build their PLPATH.

This brings me to why I am writing this post.  If you explore https://path.edlisten.com/, you will find that while PLPATH is a workflow, I have created templates using Google Slides, and I think it is important to explain why I chose Google Slides as the platform I used to publish PLPATH templates.

The initial research into a PLP platform led me to consider what information would be valuable and how should that information be presented.   I knew I wanted students to be providing information on Achievements, Goals, and a personal bio of sorts.   Like many in the past, I felt a website with a blog, or blog with some static pages would be a good fit.   There are many pluses to websites; They can be personalized and look very different from student to student.  They are not linear so that each section can be maintained independently.  Most importantly they can be shared with people who have an interest in learning more about the particular student.

Presentation based PLPs allow for personalization and individual sharing, but often become very linear and information can easily get lost.   So why then did I not go with a website/blog platform like KidBlog, Blogger, or Google Sites as my choice for a platform template for the PLPATH workflow?  The answer is distribution.  Websites/Blogs are hard to distribute to students.  At the moment there is not an easy method to provide a student with their own pre-templated website and make sure it is shared with the correct people who need to help guide students in the creation of their PLPATHs.   While for Google Slides I was able to build a quick File Distributor Add-on (https://path.edlisten.com/file-distributor) to help distribute those templates.

While distribution is important when trying to give 1000+ students a template, not losing a dynamic tool for the students is also just as important.   For this reason, I recommend treating the PLPATH Google Slide Template, not as a linear presentation that students start at the beginning, but encourage jumping around and use linking to slide feature to allow for dynamic navigation.    When I first show PLPATH to students I have them personalize their home slide, then I have them skip all the way down to the very last section and start adding achievements.   When creating goals there is a box to add links to particular achievement slides that show evidence toward that goal, and hopefully, some of the “Who Am I?” activities will help the student write personalized goals.   When a student presents their PLPATHs they should not necessarily start at the beginning and go to the end, they should jump around and show the connections between the different sections. 

PLPATH is a workflow of Achievements, Goals, “Who Am I?” activities, and a “Who I Am!” resume.  You can apply this workflow to any platform you find fits best with your environment.   Just keep it fun, dynamic and relevant to the student and I am sure you will find value in Personal Learning PATHS.

Organizing your resources: Wakelet

I recently started a new job, and was looking for a simple method for building a resource website.  I tried Google Sites, but it was going to take up too much of my time to try and maintain it.  After some research and playing around I came up with a combination of using Weebly as a shell and a program called Wakelet for adding resources.


Wakelet is very similar to many bookmarking tools, the difference is that Wakelet is designed to publically display those bookmarks on a profile website, or embed them into another site.   Now adding resources to my public site is as simple as bookmarking.


Dynamic Landscapes 2019: Personal Learning PATH (PLP)

Date: Tuesday, May 21
Time: 3:10 - 4:00

PATH is a workflow for Personal Learning Plans that is on focused on Who Am I activities, Goals, Achievements and a Who I Am statement. PATH stands for Personal Achievement Transformational Highway. At Slate Valley, we used a combination of Google Slides and an add-on in google sheets to distribute PLPATH templates to over 1000 K-12 students. This session I will explain the workflow, talk about our launch with the students, and share examples.


Student Example:
Teachers View:


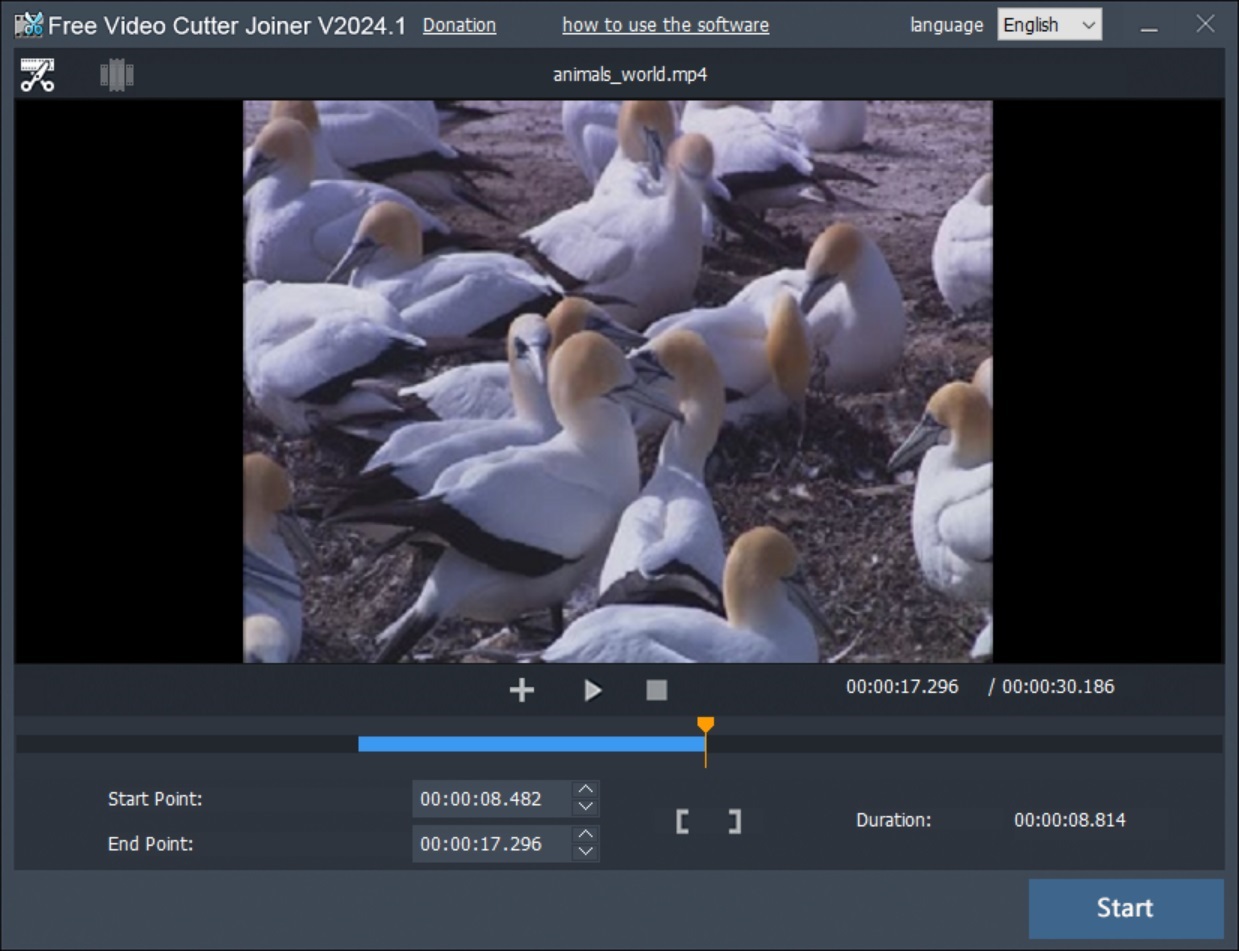
Free Video File Joiner

I bought the school a nice video camera, Canon VIXIA HF G40, for recording events and school news.   The camera has worked out very well, but like all new digital camera's it breaks the video's into multiple files.   So the search began to find a very simple software that can easily join those video files into one.    After several failed attempts I finally stumbled across DVD Video Media's: Video Cutter Joiner.   The software is just for joining (or splitting) video files, it works fast and is very simple to use.


My setup at school


New Badging Tool for schools

I just finished and published my latest Google Sheets Add-on: BadgerPD.   

BadgerPD is a Google Sheet Add-on for Micro-Credentialing / Badge tracking.  Set it up for a school,  classroom, conference, or business.   It will allow you to link to your own training's, or a public repository.   Enjoy and Never Stop Learning.

VT Fest: Build Your Own Badge Framework

Title: Build Your Own Badge Framework
Time: Thursday at 9:15
Description:
There are many places that allow you to earn badges, and they are a great way to show your proficiency level of a subject. In this session we will have an open discussion about building your own micro-credential lessons that result in earning a badge. For example, think about all the items in your makerspace, how do you know if a student can use the 3d printer, or the Arduino. Now imagine associating a micro-credential lesson with each of those items, students or teachers could complete those lessons and provide proof of knowledge.


Types of badges

Micro-Credentialing
Micro-credentialing is the process of earning a micro-credential, which are like mini-degrees or certifications in a specific topic area. They can either be broad, such as 'Machine Learning,' or specific, like 'Using Data to Differentiate Instruction for ELL Students.'What is Micro Credentialing? | Study.com

Break-out Group Discussion

Badge Tracking Tools

Badgeing and Professional Development
Activities that Qualify for Professional Learning Credit 
"As long as it fits with the professional learning standards. Documentation HAS to have the name of the sponsoring institute, dates, and hours. "

Build your own badge
Use Google Draw to create the badge. Then click File => Publish to get a public URL for that image.

Earn a badge at VT Fest
http://vtfest.vita-learn.org/badges/

Extended Learning Opportunities (ELO) at VT Fest
Thursday Block 3: 10:30 - 11:00 - Let’s Talk Micro-credentialing (Meetup) with Susan Henessey, Bjorn Behrendt, Ruben Puentedura, Tim O’Leary. 
Thursday Blocks 2,3,4,5 & Friday Blocks 2,3 - Making Physical Badges with Cricut Maker, GlowForge Laser Cutter, or Button Maker

Tips For Quickly Enrolling Chromebooks

Enrolling Chromebooks can take some time, but if you plan ahead then the process can happen much quicker.  Here are some tips that I have done to help the process along.

Tip 1: Use a usb-to-nic adapter.  Connecting to wifi during the enrollment will slow down the process considerbly.

Tip 2: In the Admin Dashboard set up a network policy so that Chromebooks in your desired Org get a device-based SSID.

  1. Open the Google Admin Dashboard
  2. Navigate to:  Device management => Networks  => Wi-Fi
  3. Select the appropriate Org.
  4. Add a device based Wifi

Tip 3: Set up an easy to type username / password.
  • Place the username into the same Org as you want the devices to go into (See Tip 4);
  • The username does not need any special permissions
  • Make the name simple to type, like: 121@yourdomain.com
  • Make the password easy to type, like: 1234567890
  • You can disable the user (or make a more complex password) after the bulk of the enrollment process is done.
Tip 4: Have the devices automatically go into a specific Org when enrolled. 
  1. Open the Google Admin Dashboard
  2. Navigate to:  Device management => Chrome  => User Settings
  3. Select the appropriate Org.
  4. Scroll down to Enrollment Controls Section
  5. In device Enrollment select "Place chrome device in user organization"
  6. If you do any asset tagging, or location tagging, I also suggest enabling the "Asset Identifier During Enrollment"

Are keystroke automation tools worth it?

  • Ones I have used: I have played with the USB Rubber Ducky, and heard of Centipede.  
  • What they do: They basically mimic keystrokes, as soon as you put the usb key into a computer, allowing you to skip the repetitive keying in.
  • Are they worth it? For our network they were not worth it; mostly because we enter the asset tag and location during enrollment.   We also found that between the Nic-to-USB and the easy to type enrollment user, the process went so quick that the above were not worth it for us.


Pizza 2018 One-to-One Challenges: Technical side of things

This post is only focusing on the technical side of the 1:1 Challenges.   There is a pedagogical aspect that also needs to be taken into consideration with any 1:1 initiative.
-Bj


Evaluating Hardware


Resources:
  • 1:1 Agreement
  • Track 1:1 Agreements
    • Example Document
    • Magic Formula: =IF(ISERROR(MATCH(A2,'Signed 1:1 Agreement'!A:A,0)),"","Yes")
    • Data Validation to get pull-down of list
    • EZ Query Add-on ~ new install link coming soon.
  • Incidents
    • $25 per incident/replacement charger/replacement bag
    • Incident form
      • Simply Send ~ generate receipt
  • Spares
  • Collection time


Get teachers using it daily.

jQuery/Javascript Promise

JavaScript programming runs things in order as it reads the code, but it doesn't stop to wait for the previous operation to complete before moving on.   This improves performance, but there are times where you need a bit of code to complete before you run another function.    The solution to that is called a "promise".  Basically as the code is read it will see that one particular piece of code (function) promise's to wait till another piece is done.

I use jQuery when I code, and the method I found that works best for myself is to use $.when().then(); statement.

Below is a quick example of how I format the $.when().then(); statement.

var promiseFunction = function(){ console.log("run this first") }; 
//You can include this inside the "when" brackets, but I found it cleaner to keep it separated.  This will run right away.
$.when( promiseFunction ).then(function(){  console.log("run after")  }); //The "then(function(){})" will wait till the promiseFunction is complete before running.
console.log("this will not wait for promiseFunction to complete and will run right away");
//The rest of the code will continue to run at the same time as "var promiseFunction"

End of the Year with Google Classroom


This is a quick video showing how to archive a Google Classroom and then retrieve a post from that archive

Start Video Blogging Now: Dynamic Landscapes Presentation

Tuesday, May 22, 2018 at 2:00

Whether you use it for flipped learning, or your students use the tools to show proficiency, learning to video blog will enhance your classroom.   This session I will cover creating a YouTube channel, recording tools for screencasting and video editing, hardware you might use like video cameras and microphones, as well as techniques for planning your presentations.   Watch the intro video: http://bit.ly/DL2018VideoBlogging


Subscribe to my channel: 

Subscribe to my daughters channel:


YouTube
  • Youtube Settings (Sprocket) (access only when in the creator studio)
    • Create new channels
    • Add other managers to those channels
  • Channel
    • Your Customizable YouTube Website
    • The goal is for people to subscribe to your channel
  • Creator Studio
    • Upload videos
    • See statistics about your video's
  • Upload videos
    • Public, Unlisted, Private
    • PlayLists
  • Live Stream
    • 60sec delay
  • Edit Video's
    • Enhancements
      • Blurr Faces
      • Slow Motion / Timelapse
      • Trim / Stabilize / Other
    • Audio
    • Annotations / Cards


Resources:

Software

Hardware

  • Webcams
    • Any webcam should work, I tend to go with Logitech.
    • I like using ones that are for 780p instead of 1080p.  They both have a similar quality image, but 780p has a narrower field of view, so they tend to pick up less of the background, and allow a more focused headshot. 
    • Ipevo Webcam
  • Video Camera's
    • Under $200 cameras are often not worth the money.  Watch out for fake Amazon.com reviews on them.
    • Look for an external mic input
    • Don't buy the amazon.com package deals.  
    • FHU owns the Canon G40
    • Cellphones are probably one of the best video camera's you will find
    • DSLR for video
      • Many professional video bloggers now use DSLR cameras for video blogging.
      • Advantage
        • Nice high-resolution video's
        • Able to blur the background
      • Disadvantage
        • Limited to 30 minutes of continuous video.  All DSLR's will have this limitation because if they recorded longer they would be classified as a video recorder and subject to higher shipping fees. 
    • Audio
      • People are less forgiving of bad audio than they are of bad video.
      • Headset: Logitech USB H390
      • Microphone: Audio-Technica ATR2100
      • External video camera mic: Rode VideoMic Pro 
        • Careful with less expensive Rode mics or any external mic without a built-in power source. These tend to use the camera for power, and will only work with specific models of video cameras.
      • Wireless Mic: Rode RodeLink
      • Conference Mic: Jabra Speak

    The very fun Augmented reality (VR): Merge Cube

    This is a very fun, augmented reality toy/tool that allows you to manipulate an object as if it was in your hand.   It works with your phone or VR headsets.  The best part is that it only costs $5 on Amazon

    Greenscreen Wall and WeVideo

    So my work just got a new video camera and I really wanted to find a project to play with.  We also have a large painted greenscreen wall.    This was my quick introduction into greenscreen, and the things that you can do.


    Be Smart On Air #31: Edu Tech Talk

    Having fun with a former/current follower turned podcaster +Niilo Alhovaara on his "Be Smart On Air" podcast.


    Hp x360 EE Chromebook with Stylus #teardown4ed


    Out of the convertible tablets that I tested, I liked the HP x360 the most.   If you want the stylus make sure to request that version at the time you purchase it, because it is not something you can easily add-on later.

    Ziteboard web-based whiteboard


    Ziteboard is a very simple quick web-based whiteboard that works on Chromebooks. This is my app of choice as an alternative to Smart Notebook.

    Asus C213 unboxing, review & teardown #teardown4ed


    This video I am looking at how well the Asus C213 might workout in a 1:1 Chromebook school.

    Please subscribe to my YouTube Channel: https://www.youtube.com/c/EdlistenPodcast